Sunday 30 June 2013

Courgettes and philadelphia quiche

"Great for picnics or for lunch at work, this easy to make quiche is just lovely!" 


Ingredients

  • 1 puff pastry sheet
  • 2 medium courgettes
  • half onion
  • 2 eggs
  • 200g of Philadephia
  • grated Parmesan
  • nutmeg
  • a tablespoon of milk
  • a couple of tablespoons of olive oil
  • salt and pepper

Tools

  • oven
  • baking tin
  • baking paper
  • good kitchen knife and chopping board
  • mixing bowl
  • wooden spoon
  • a fork
  • grater
  • 26/28cm saucepan with lid

Preparation

  • Chop the onions and slice the courgettes in disks
  • Grate a handful of Parmesan
  • Grate a quarter of a nutmeg
  • Set the oven at 180°C (Gas mark 6) - top and bottom + fan if you have it
  • Place the baking paper to cover the baking tin

Cooking

  • Gently soften the chopped onions in the oil then add the courgettes in the pan
  • Cover the pan and cook for 20 minutes until soft
  • Add salt and pepper to taste
  • In the meantime beat the eggs in the mixing bowl, add the Parmesan, nutmeg, milk and Philadelphia and mix until even
  • Place the pastry in the baking tin, on top of the baking paper
  • Pierce the pastry with the fork making tiny holes on the surface
  • Pour the courgettes and distribute evenly on the pastry
  • Pour the liquid in the mixing bowl on top of the courgettes
  • Top with some more grated Parmesan
  • Put in the oven on the middle shelf

Serving

  • Let it rest for at least 20 minutes before cutting it
  • Lovely with a simple salad

Tips

First thing, cook the courgettes as it takes time. You can do all the rest as you wait for the courgettes to be ready. Switch on the oven when the courgettes are nearly ready, just to save, really! Take the pastry out of the fridge when you start so that it will be soft to unroll and place in the tin, when it's cold it can break. It can drive you mad if you try to unroll it and place it when still cold from the fridge. If your pastry sheet is rectangular, just cut off  the 2 extra stripes that don't fit the round tin and use them to fill the gaps on the other sides, no one will notice! That's it really, very, very easy. Enjoy!

Saturday 1 June 2013

Chicken salad with mayo, celery, olives and cheese

"Either with bread or on its own, this chicken salad is fresh, creamy and crunchy at the same time. Perfect as an appetiser or in sliced bread for a work meal or picnic." 


Ingredients

  • 1 boiled chicken breast - see stock recipe
  • 2 sticks of celery
  • a handful of green pitted olives
  • a handful of medium hard cheese in cubes - i.e. Gruyere or Emmental
  • 3/4 table spoons of mayonnaise

Tools

  • good kitchen knife and chopping board
  • medium bowl

Preparation

  • Chop finely the boiled chicken breast
  • Chop the celery sticks in 2/3mm thick slices
  • Make the cheese into cubes
  • Slice the olives 
  • Put everything in the bowl
  • Add some mayo and mix everything until it sticks together without feeling dry - add more mayo if needed

Serving

  • Good bread is highly recommended!

Tips

Well... you can't really get this recipe wrong... the homemade mayo gives a fresher touch, but I made it with industrial mayo many times and it's still pretty good. I have often used it as filling for sandwiches I brought to picnics... always greatly appreciated!

Sunday 26 May 2013

Stock economy - why making your own stock?

"Stock cubes are handy, but making your own stock is as easy as it is rewarding. You will soon discover a whole new world of interlinked dishes, from ravioli in stock to risottos, from chicken salad to butternut squash cream... and many more..." 


Ingredients 

Ingredients can vary depending on what you want to achieve. Here I have listed the basic ingredients to make mostly vegetable based stock, which is the most versatile. Further below you will find any potential extras.
  • 1 or 2 carrots
  • 1 big onion
  • a handful of parsley
  • 1 or 2 celery sticks
  • a spoon of rock salt
  • 2 cloves
  • 2 peppercorns
  • a nut of butter
  • a ripe tomato or a small squeeze of tomato puree
  • a bay leaf
  • water
 Optional ingredients:
  • a chicken breast
  • any cheaper beef on the bone
  • pumpkin or butternut squash

Tools

  • 5 litres pot with lid
  • good kitchen knife and chopping board

Preparation

  • Peel, wash  and chop in big chunks carrots, celery and onion (and tomato if you have one)
  • Wash the parsley and cut off the part with no leaves, then chop twice the remainder
  • Add all the ingredients to the pot - including meat and/or peeled pumpkin/butternut if you have it
  • Pour cold water to fill up most of the pot

Cooking

  • Put on high heat until it boils
  • Reduce to minimum and let it simmer for about an hour

What now?

Well... usually I make stock to make risotto. I either make the risotto straight away or take half of it and put it in a pot and, once cold, pour the reminder in a plastic container with cover and freeze it for when I need it. With the boiled chicken you can make a chicken salad or just add it shredded to a simple salad. With the boiled pumpkin/butternut squash you can make a lovely cream to pour on toasted bread with olive oil. If you boiled meat in it, you can mix it all in a food processor and make meatballs to coat in breadcrumbs and deep fry. You can also simply take the stock, heat it up and boil ravioli in it.

Of course a stock with pumpkin will be great for a pumpkin risotto, whilst a meaty stock will suit better a sausage risotto, but usually a vegetable stock with or without a chicken breast, will do for most of the risottos you wish to make.

I will be adding all the recipes mentioned above in the weeks to come! Stay tuned!

Monday 6 May 2013

Pak choi and hard cheese pasta bake


"Pak choi or Swiss chard have a lovely bitter taste that goes very well with cheese; mix it with pasta, top it with Parmesan and breadcrumbs, some butter, then stick it in the oven... and you'll be 15 minutes from heaven. Make double quantity and the left overs the day after will taste even better!" 


Ingredients

  • 1 or 2 bunches of Pak choi or Swiss chard (depending on how big they are)
  • 1 or 2 garlic cloves
  • 500g short pasta (i.e. Tortiglioni, Penne or Fusilli)
  • 10g of butter + some more for the baking tray and the crunchy crust
  • 20/30g medium/hard cheese in cubes
  • grated Parmesan
  • breadcrumbs (or old dry bread)
  • rock/coarse salt (for the water)
  • salt and pepper

Tools

  • 26/28cm saucepan with lid
  • 5 litres pot
  • good kitchen knife and chopping board
  • colander
  • wooden spoon
  • oven
  • food processor or grater only - if you have ready-made breadcrumbs
  • baking tray

Preparation

  • Fill 3/4 of the pot with water and put on medium/high heat  
  • Wash thoroughly the Pak choi/Swiss chard and cut it in slices
  • Take a large baking tray and coat it with some butter
  • If you don't have ready-made breadcrumbs, use the food processor to make them and add a few Parmesan cubes as you mix it
  • Put the butter in the pan
  • When you are half way through the cooking process, heat up the oven to 200°C (Gas mark 6) on fan + grill (if you have this feature)

Cooking

  • When the water boils add 3/5 teaspoons of coarse salt and add the Pak choi/Swiss chard 
  • After 10/15 min check the white parts of the vegetable; if they are translucent they are cooked
  • Drain the Pak choi/Swiss chard using the colander and set aside
  • Put the pan with butter and garlic on medium/high heat
  • Fill again 3/4 of the pot with water and put on medium/high heat
  • When the garlic has browned a little add the drained Pak choi/Swiss chard and cook for 5 minutes, then turn off the heat
  • When the water boils add 3/5 teaspoons of coarse salt
  • When the water boils again add the pasta and cook according to the packaging
  • When the pasta is ready, drain it using the colander 
  • Add the cheese cubes and the pasta into the pan and mix well before covering with the lid
  • When the cheese has melted, pour all the pasta into the baking tray and distribute evenly
  • Top the pasta with your breadcrumbs/Parmesan mix
  • Add a few small pieces of butter on top (6 or 8 scattered around)
  • Put in the oven on the second level
  • Cook until brown on top

Serving

  • Nothing to add, really. Just put it on the plate and enjoy!

Tips

It does take some time, as you have to boil the vegetables first, then the pasta and then put it in the oven, but what can I say, it is worth it! If you are short of time, you can also cook the chard the day before and let it cool down, stick it in a box and put it in the fridge and make the pasta bake the day after. If you make 500g of pasta you can make 5/6 portions out of it and as I said, the day after it will be very tasty, although maybe not as crunchy. It is a perfect lunch box recipe. Just try not to overcook the chard. It's nice when it still retains a bit of resistance when biting it, but it will still taste good even if it falls a bit apart. Also please be aware that the chard will lose 80% of its weight after boiling! When in doubt, just buy more of it. Don't be afraid to press it into the water, it will reduce drastically in size soon after.

Cheese burgers with onions


"Who said burgers need to be in a bun with salad? Fry them up in olive oil with onions; top them with cheese, add any side dish and you are done!" 


Ingredients

  • as many burgers as you can fit in your pan
  • 1 or 2 table spoons of olive oil
  • 1 medium onion
  • mild cheese - gouda, emmental or cheddar slices

Tools

  • medium/large frying pan with lid
  • good kitchen knife and chopping board
  • wooden spoon

Preparation

  • Peel the onion and chop it in half
  • Chop each half in 4/5mm thick slices
  • Cut the cheese in slices, unless you bought it sliced
  • Put the oil in the pan

Cooking

  • Heat the oil on medium/high heat
  • Add the burgers and cook them slightly on each side
  • Add the onions and scatter them around
  • Cover with the lid and turn to medium heat - reduce the heat if it gets too dry and the onions start getting brown
  • When the onions are soft, turn off the heat, add the cheese on top of the burgers, then cover with the lid
  • Serve when the cheese has melted

Serving

  • It goes very well with a simple saladpan-roasted potatoes or buttery carrots
  • I like to add a bit of ketchup and/or mustard
  • If you feel like being particularly unhealthy, fry up an egg in the same oil, after removing the burgers and onions, and then add it on top - it does give some satisfaction

Tips

Well... not much to say, but as always, the quality of the burger can make a difference. However as you have onions and cheese to go with it, even if they are not the best quality, they will most likely still be pretty tasty. If you like them rare, take them off the pan and cook the onions on their own for a few minutes, then add them back in for the final cheese melting. BTW, without cheese they are pretty good as well!

Buttery carrots with garlic and sage

"I hear people sometime say they don't like carrots, but all they have in mind are those insipid, boring, plain, boiled ones you get often served in pubs, schools or office kitchens. Add butter, sage and garlic and trust me, you won't think of them in the same way again!" 


Ingredients

  • from 350g to 750g of carrots
  • 8g to 15g butter
  • a bunch of sage or 4/6 leaves
  • 1 or 2 garlic cloves
  • salt and pepper
  • grated Parmesan 

Tools

  • large saucepan (26/28cm) with lid
  • wooden spoon
  • good kitchen knife and chopping board
  • potato peeler

Preparation

  • Chop the large end of each carrot
  • Peel off the exterior with the potato peeler
  • Chop all the carrots in thin discs 1 to 3mm thick
  • Wash the sage and peel the garlic cloves
  • Put butter, sage and garlic in the pan

Cooking

  • Put the pan on medium heat and melt the butter
  • Brown slightly the garlic without burning the butter
  • Add the carrots
  • Cover with the lid
  • Cook the carrots for at least 20 min checking every 5 min to make sure they are not getting too dry - you can add a bit of water so they continue steaming without burning
  • When the carrots are fairly easy to break with the wooden spoon, add salt and pepper and stir well, then switch off - don't be hasty! Let them cook until soft! 

Serving

  • When on the plate grate the Parmesan generously on top

Tips

The most difficult part is chopping the carrots. It's really boring! Make sure you have a good, large kitchen knife with a plane blade. Chopping them with the wrong knife will take longer and drive you mad! Don't get too obsessed with making them all the same thickness, just avoid super-chunky ones and you'll be fine. The trick is to steam cook them in their own water, however if the heat is too high they will dry before cooking well and you will burn them. If needed, just reduce a bit the heat and/or add a bit of water to help. when in doubt, let them cook for a bit longer, they are very difficult to overcook.

Sunday 21 April 2013

Pasta cream, speck, courgette and saffron

"This colourful, flavoursome, but at the same time delicate pasta dish can sound pretty elaborated, although it is actually extremely easy to make!" 


 Ingredients

  • 500g short pasta (i.e. Penne or Fusilli) 
  • 1 shallot
  • 1 courgette
  • 100/200g of smoked ham (Speck or Black forest ham)
  • 15g butter
  • 300ml single cream
  • saffron (in powder or dried stems)
  • 1/4 glass of white wine
  • rock/coarse salt (for the water)
  • salt and pepper
  • grated Parmesan (optional)

Tools

  • 26/28cm saucepan
  • 5 litres pot
  • good kitchen knife and chopping board
  • colander
  • wooden spoon
  • multi-size grater 

Preparation

  • Fill 3/4 of the pot with water and put on medium/high heat  
  • Put the butter in the saucepan
  • Chop the shallot finely
  • Chop the ham in small stripes/squares
  • Wash the courgette, chop top and bottom and grate it all on the half centimeter sized holes side of the grater

Cooking

  • Put the pan with the butter on medium/high heat and add the chopped shallot into it
  • When the shallot has cooked until soft, add the ham 
  • Stir well to prevent the shallot from burning whilst keeping an eye on the ham
  • When the ham looks cooked (after 3/5 min), pour in the white wine, increase the heat and make reduce
  • Once reduced, add the courgette, reduce back to medium heat and stir occasionally as they cook, for about 5/7 min
  • When the courgette looks cooked, add the cream, the saffron, salt and pepper, stir well and reduce the heat - let it cook for 10 min whilst stirring occasionally to gently thicken the cream 
  • When the water boils, add 3/5 teaspoons of coarse salt
  • When the water boils again, add the pasta and cook according to the packaging
  • When the pasta is ready, drain it using the colander and add it to the sauce in the pan whilst mixing well

Serving

  • Add some freshly ground pepper on each plate and/or grated Parmesan

Tips

Well... this pasta is really very easy to make. The only thing i can say is to avoid cooking the sauce for too long/too high heat after adding the cream, otherwise it will get dry and lumpy. The cream needs to thicken gently whilst bringing all the flavours together. I usually don't put any salt in the sauce as the speck is quite salty anyway. If you feel it needs a bit of salt when you have already served it, just add Parmesan on top instead!

Sunday 14 April 2013

Chicken, sage, Parma ham and hard cheese on a skewer

"Voted best dish at Rockstar Lincoln first Guest Chef event, these small chicken wraps hold a surprisingly powerful richness of flavour. It doesn't matter how many you prepare, you'll always want another one. Mouth watering." 


Ingredients

  • 2 chicken breasts
  • 4/6 slices of Parma ham
  • 10/12 medium sage leaves
  • 10/12 small cubes of any hard cheese  (nice cheese please!)
  • 10/12 short skewers/wooden tooth picks
  • 1/2 glass of white wine
  • salt and pepper
  • a table spoon of olive oil

Tools

  • good kitchen knife (smooth/even blade, no dents) and chopping board
  • 26/28cm frying pan, ideally non-sticky, but not essential
  • pan lid

Preparation

  • Cut the hard cheese in small cubes
  • Wash the sage leaves and dry them quickly by shaking them
  • From each chicken breast take off the small piece half detached that you always find on the bottom side of the breast and use the knife to make thin fillets out of the remainder, by holding the chicken pressed against the chopping board with your hand and slowly sliding the knife through - try to make them fairly even, not too thin, not too thick. You should be able to get one uneven smaller piece and 2 nice full length fillets off each chicken breast
  • Cut the 2 nice fillets in half, to obtain 4 pieces, roughly 5/7cm long
  • Once you have your 10/12 pieces of chicken, beat them gently with the part of your palm close to your wrist in order to flatten them a bit - the chicken is already dead, so take it easy!
  • Sprinkle some salt and ground pepper on one side of each piece of chicken
  • Depending on the number of chicken pieces, cut the Parma ham in an equal number of pieces, roughly the same size of the chicken if possible
  • Take one piece of chicken and place the ham on the side you haven't put any salt/pepper on
  • Put a piece of cheese in the middle
  • Roll or fold the chicken/ham around the cheese - if thin and long, roll, if squared and small, fold; or try both and see which makes it hold together best!
  • Place a sage leaf where the skewer will go through and close the fold/roll with the skewer, ensuring the cheese is well blocked inside and the sage leaf is securely attached
  • Repeat the above until all the wraps have been prepared

Cooking

  • Heat up a full table spoon of oil in a large frying pan
  • When pretty hot, add the wraps and make them brown on high heat
  • When nicely browned (not burnt!) turn each of them - you can use your hands by picking them from the skewer if you are careful
  • When browned on both sides and sizzling add the wine and cover with the lid
  • Let them cook for 3/5 minutes with the lid on to ensure they cook thoroughly
  • Remove the lid and keep stirring/moving them until the wine reduces and the juices brown slightly creating a sticky glaze - this can take 5/10 min depending on how high is the heat and how much wine you added

Serving

Tips

OK, it can sound daunting, but trust me, it's a lot easier than it seems. First thing first, they will not all look cute and nice. Each wrap will be bigger or smaller, well closed or a bit held together by a miracle, it takes time to master, but the truth is that there's no right shape. I like to make them small and simple with little cheese inside. Making the cheese cube too big will make it harder to close. The choice of cheese is very important too. I recommend medium/hard cheese, like Comte or Gruyere. If the cheese is too soft it will melt out of the wrap potentially spoiling the whole dish (or making a nice creamy cheesy juice!). As soon as they cook, they will hold together, as long as they have a minimum of stability when they first get in the pan. Either way, even when they don't look that pretty, they always taste great!

Sunday 10 March 2013

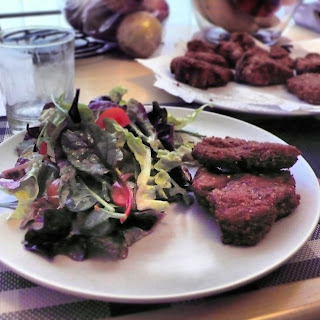
Deep fried breaded lamb chops

Breaded lamb chops
"Lamb is delicious; breaded and deep fried stuff is scrumptious; and guess what? Deep fried breaded lamb chops are simply amazing. I don't know how, but they just melt in your mouth. The only problem? They are never enough..." 


Ingredients

  • 6/8 small lamb chops - 3 per person is a reasonable amount
  • breadcrumbs - I keep old bread and ground it with a food processor, cheap and natural!
  • 1 egg
  • salt and pepper
  • 250ml of sunflower oil

Tools

  • food processor - unless you bought ready-made breadcrumbs
  • small bowl 
  • mixing bowl
  • frying pan or wok or deep frier
  • good kitchen knife and chopping board
  • a fork
  • 2 plates
  • 2/3 kitchen roll sheets

Preparation

  • Lamb chops come with a stripe of fat on the side which joins the meat on the bone with another small amount of meat. Strip off the fat but keep the small piece of meat on the other end, it's lovely too
  • Once all the fat has been removed you will be left with 6/8 chops and 6/8 small pieces of meat, but don't be obsessed with it, a little fat won't kill you. If it's hard to take it all off, just leave it
  • Break the egg in the small bowl, add salt and pepper and beat it with a fork
  • Open the breadcrumbs or make them with the food processor and pour them into the mixing bowl
  • Pour about 250ml of sunflower oil in the frying pan or wok - I use a wok so you need less oil to have a deep oily pond
  • Take 2 plates and put 2 or 3 kitchen roll sheets on one of the two plates - it will absorb the extra oil when you take the meat off the pan

Cooking

  • Put the pan/wok on high heat
  • Whilst the oil heats up you can start the process of dipping the lamb in the egg and coat it with breadcrumbs - I start with the small pieces first, then I do 2 chops at the time
  • Make sure you coat them evenly with egg and then let the egg drip down whilst you hold them with the fork before putting them in the mixing bowl with the breadcrumbs
  • Rotate or shake gently the mixing bowl with your hand to make the lamb coat itself with breadcrumbs and then use your finger knuckles to gently press and flatten the meat to make the coating stick to it- touch the lamb only when already coated so that your hands will stay clean
  • Once the lamb is well coated, place it on the empty plate, unless the oil is ready
  • At this point it's chain production time! When you think the oil is hot enough, place one small piece of lamb into it and see if it sizzles nicely. If it does, then add a couple more pieces but don't overcrowd it
  • Whilst the first round is cooking, you can coat another 2 chops with breadcrumbs
  • After 2 minutes, turn the lamb chops so they cook on both sides - the small pieces usually don't need to be turned as they are fully covered in oil
  • Each piece cooks in about 5 minutes in total - small pieces in 3. Cooking them for too long will make the meat harder and burn the bread coating
  • Use the fork to lift the meat off the pan and place it on the plate covered in kitchen roll sheets
  • Continue the process until all the meat has been fried

Serving

  • You can put squeezed lemon and salt on the plate, however I put salt only in the egg and enjoy the pure taste of the lamb and crunchy coating with no extra salt, nor sauces - mustard or mayo maybe, but ketchup would be a waste
  • It goes very well with roasted potatoes or a simple salad

Tips

Well... first of all, go to your local butcher and buy fresh lamb chops. Small lamb chops are incredibly tender and particularly well suited for this dish. If you buy good bread on a regular basis, keep the pieces you don't eat in a paper bag and make your own breadcrumbs. I buy often seeded bread which makes amazing breadcrumbs. If you don't feel too confident in frying whilst still preparing the chops, coat them all first and put the on a plate, then fry them all. You can always prepare the salad whilst you fry the meat. I like saving time by doing the three all together, but I understand it takes some time to master chain production. Oh, another thing, please eat with your hands! Hold the chops from the bone and bite the meat off it, using fork and knife takes away half of the pleasure!

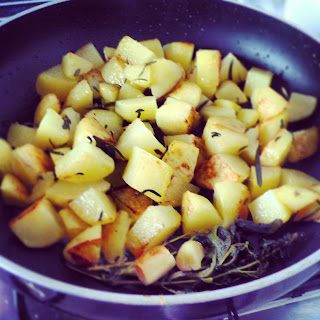
Pan-roasted potatoes with garlic, sage, rosemary and thyme

Roasted potatoes with garlic, sage, rosemary and thyme
"Either boiled, fried or roasted in the oven, potatoes are always great, but roasting them in a pan with olive oil, garlic and herbs is a very quick way to get an outstanding side dish. Unbeatable!" 


Ingredients

  • 3/4 medium sized potatoes
  • 1 rosemary sprig
  • a few sage leaves
  • 1 thyme sprig (optional)
  • 2 garlic cloves
  • light olive oil
  • salt

Tools

  • non-stick frying pan with lid
  • potato peeler
  • good kitchen knife and chopping board

Preparation

  • Put a good 3/4 table spoons of light olive oil in the frying pan - if the oil is too little the potatoes will absorb it all and burn, not fry
  • Peel the garlic and wash quickly the herbs and put them in the pan
  • Peel the potatoes and cut them in cubes - try to cut them of similar size so they will cook evenly

Cooking

  • Put the pan on medium/high heat
  • Brown the garlic and the herbs for a couple of minutes
  • Add the potato cubes and stir well, then cover with the lid
  • Reduce the heat to medium and stir occasionally every 2 minutes for a good 10 minutes
  • When you see that the potatoes are pretty much cooked - you can check with a stick or knife - remove the lid and turn to medium/high heat
  • Let the potatoes brown for a few minutes turning them every now and then
  • Add salt to taste, mix well and take off the heat

Tips

The difficult bit is to balance the cooking right. If you cook them with the lid on for too long or at too mild heat, they might boil more than roast and fall apart before you can get the right crunchy coating. On the other side if you set the heat too high, you might burn one side whilst they are still row inside. Another factor is the size. Try to cut the potato cubes so that they are pretty even in size, as the small bits will cook faster whilst the bigger ones could still be row inside when you take them off the stove. In either case you need to use a non-stick pan, otherwise they will break and you will end up eating pan roasted mash potatoes.